
Onomata
Using Onomata Vocabulary Tester
Onomata allows you to test yourself in multiple choice or type-in format on vocabulary files previously saved. A vocabulary file consists of up to 2500 items arranged in up to 250 separate vocabulary lists.
[TOP]
Setting Up a Test
When you first run Onomata, the program displays a Setup window.
Start at the top of the window in the frame headed Load vocabulary file.
Click on the Load Vocabulary File button and choose the vocabulary file you wish to be tested on; this will be a text (.txt) file , usually in a folder for the language concerned.
Once a vocabulary file is loaded, the Setup window will alter accordingly, as in the following example:-

Now move to the frame headed Select vocabularies to be tested on.
Here there are two boxes, one labelled Selection and the other Vocabulary contents .
The Selection box shows the vocabulary lists you wish to be tested on; when you first load a vocabulary file, all lists within that file are by default selected.
The Vocabulary contents box gives information on the contents of each list within the loaded vocabulary file (if this information has been provided by the creator of the file).
Choose the vocabulary lists you wish to be tested on by typing their numbers in the Selection box. Numbers must be separated by a comma; groups of lists may be indicated by a hyphen. For example :- 3,5-7,10-15,20 selects vocabulary lists 3, 5, 6, 7, 10, 11, 12, 13, 14, 15, and 20. You may also select lists by clicking on them in the Vocabulary contents box.
The 'direction' (e.g. French-English or English-French ) of the test may be set by clicking on one of the two radio icons indicating the languages involved.
You may also choose :-
When a vocabulary file has been loaded, three buttons will appear below the Selection and Vocabulary contents boxes; each opens a new window when clicked on:-
Review Selection

This allows you to read through the items you have selected for testing, optionally displaying meanings as you do so. Use the right-arrow on your keyboard or the yellow > button in the Review window to move forward through the list and the left-arrow or yellow < button to move back . Use ? on your keyboard or the Reveal button to display the meaning of the current item; to hide the meaning, use ? again or the Hide button. By default, items are listed in the order they were entered by the creator of the vocabulary file but they can also be shuffled into a random order by clicking on the Shuffle items button.
View Selection
This allows you to see the items you have selected for testing in the order as entered by the file's creator. The window size is adjustable and it is possible to zoom in/out on the list of items.
Print Selection
This opens a Windows print dialog box so that you can print the list of selected items if required.

If you have the single-user version of Onomata, type your name in the box labelled Your name (in the network version, the logon name of the user is entered here automatically).
When you are ready to start a test, click on the purple Start Test button.
Alternatively, click on one of the other three buttons:-
View Mistakes (see Viewing test mistakes ) displays a list of any errors made on the last test taken (on any vocabulary file, not necessarily the currently loaded one); this list may be saved or printed out if required.
View Scores (see Viewing and printing high scores ) displays the top 10 and top 250 scores previously obtained on tests on the vocabulary file currently loaded; the scores may be cleared or printed out if required.

Print Test (see Printing a test ) opens a Windows print dialog box to allow the printing of a test based on the vocabulary file currently loaded and the test criteria currently set.
[TOP]
Taking a Test
When you press the purple Start button in the Setup window, this window disappears and one of the Onomata Test windows replaces it.
Multiple Choice Test - 1-Player

Questions appear in the yellow box .
Answer by clicking on whichever is correct of the five light blue boxes . If you are right, the box will turn green; if you are wrong, it will turn red and the box containing the correct answer will turn green.
For the next question, click on the yellow box .
A vocabulary file may have been written to make use of categories of items e.g. nouns, verbs, etc. If so, and if the categories option has been selected in the Setup window, the five possible answers in the light blue boxes will be of the same category e.g. all nouns or all verbs (as long as at least 10 items of that category are in the vocabulary lists selected for inclusion in the test).
Multiple Choice
Test - 2-Player 2-player Multiple
Choice uses a similar format to 1-player but is operated via the keyboard
rather than the mouse. By default one player uses the number keys from 1 to 5 at the top of the keyboard and the
other the 1 to 5 on the numeric keypad; if Keys
A has been selected in the Setup
window, one player uses the keys A S D F
G and the other K L : @
# . Each question appears for 5 seconds, during
which time either or both players can press the key corresponding to the answer;
the correct answer is then revealed and the results of the players' key presses
shown. If both players are correct, the faster scores 7 points and the slower 5 . If a player gets a wrong answer, s/he loses
5 points. If only one player
answers within the time limit, that player gets 5 points and the other 0 . If neither player
answers in time, they both get 0 points. The game is won either when one player reaches
100 or more points or when the difference in the players' scores is 25 or more;
the game also ends if both players have negative scores.

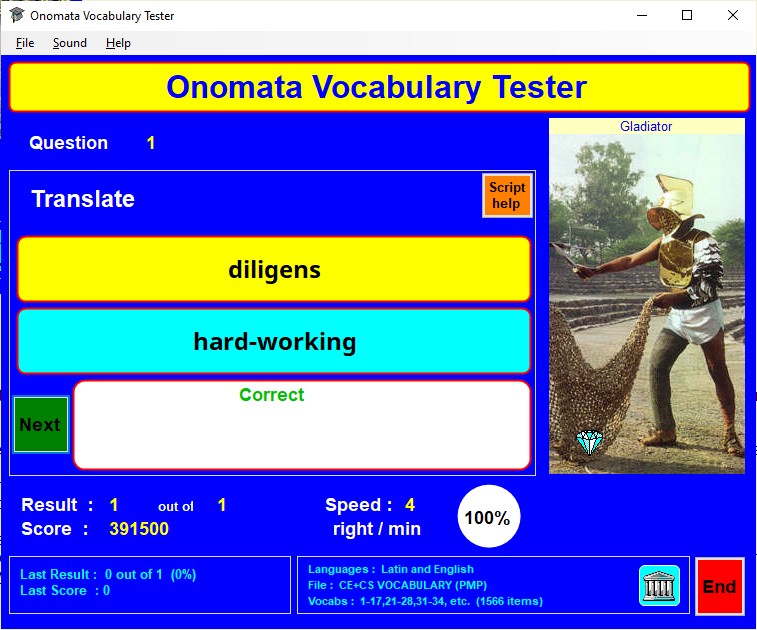
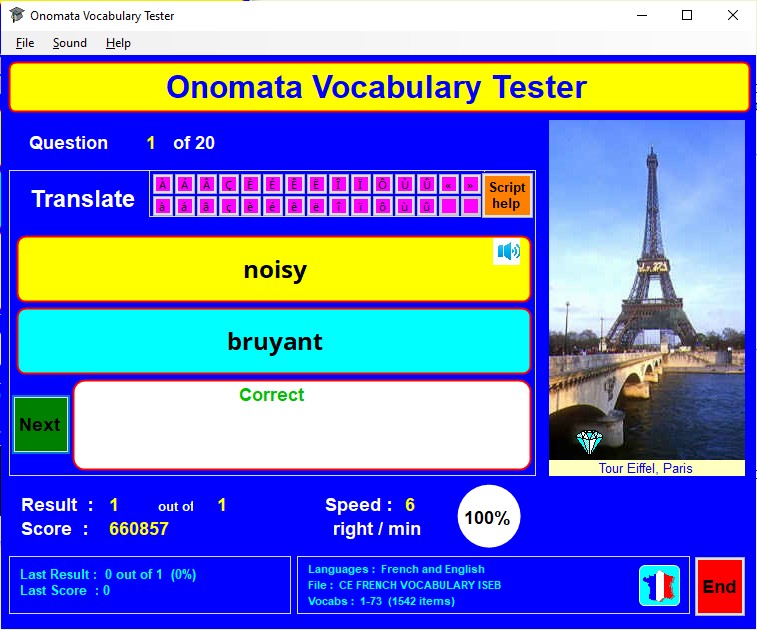
Questions appear in the yellow box .
If a 'speaker' symbol appears at the top right of the box, clicking on it will cause the displayed word to be spoken aloud; availability of this feature depends on a suitable text-to-speech voice file for the language concerned being installed on your computer.
Type your answer in the light blue box and click on the OK button or press the Enter key.
If your answer is correct, the white box below will indicate this. If it is wrong, the white box will show the correct answer; if there is more than one possible correct answer, you can cycle through these by clicking on the answers.
Note that a 'correct' answer is one which exactly matches the letters, punctuation marks, and spaces of the answer given in the vocabulary file. The case of the letters is ignored unless the case option has been selected in the Setup window. Extra spaces typed at the beginning or end of an answer are always ignored.
So, for example, with case ignored, if the vocabulary file contains How many? as an answer, a user entry of how many? or How many? (or HOW MANY?, HoW maNY?, etc.) would count as correct but how many (without the question mark) or how many (with an extra space between the words) would not. With case significant, only How many? would be acceptable.
If you need to enter an accented or other special character , click on the appropriate purple button above the yellow question box.
It is also possible to type in scripts other than the Latin alphabet. In general and where possible, typing a Latin alphabet letter on the keyboard will give its script equivalent (e.g. typing d will give δ for Greek, д for Cyrillic, and ד for Hebrew). Full information on correspondences between keyboard and script can be viewed by clicking on the orange Script help button above the yellow question box.
For the next question , click on the Next button or press the Enter key.

The left side of test window will show a list of 10 items in one language. The right side will show a list of 10 (or 13, if the Hard option was selected in the Setup window) items in the other language. In the middle are 10 light blue boxes .
To complete the test, drag items from the right-hand list into the light blue box adjacent to their corresponding meaning in the left-hand list as fast as possible until all the light blue boxes are filled.
To change the content of a light blue box, drag another item into it.
To remove an item from a light blue box, click on the box.
Once all the light blue boxes are filled, the window will show which are correct. If there are errors, continue moving items until all errors are removed.
Your score for the test depends on your speed at correctly filling all the light blue boxes, with a bonus for completion without errors on the first attempt.
Match-Up Test - 2-Player
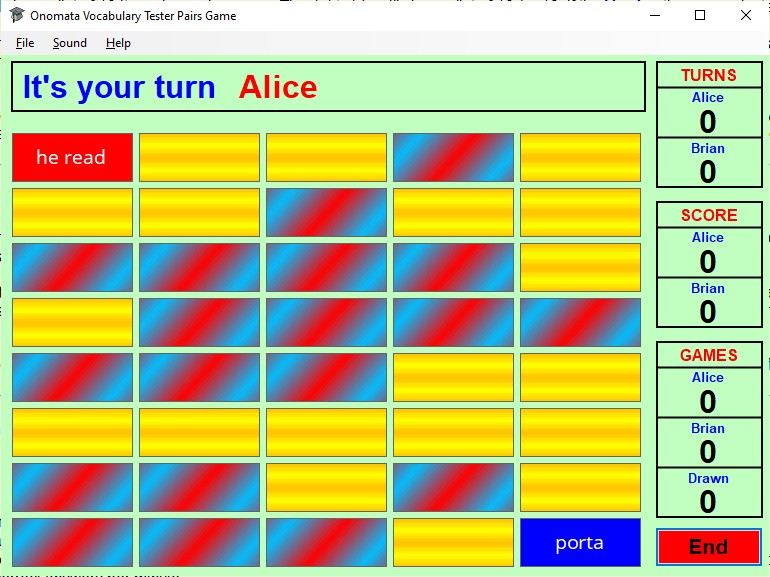
This is a Pelmanism or memory game. Depending on whether a 10 question or a 20 question test has been selected in the Setup window, 20 or 40 tiles respectively are displayed as a grid. If the Hard option was also selected they will all show the same pattern; otherwise they will have two patterns, one for each language involved.
Players take it in turns to select two tiles. Selecting each tile reveals an item; both items remain visible for a few seconds after the second tile has been selected.
If the two items selected correspond in meaning (and the tiles therefore match), both tiles are removed from the grid and the player gets another turn; if not, the tiles remain (with the items now concealed) and the other player has a turn.
The game ends when all pairs of tiles have been removed from the grid. The winner is the player with the most pairs found; if both players have found the same number of pairs, the game is a draw.
Multiple Choice and Type-In Test - Score Information
Displayed Test Information
Ending a Test
A test may end in one of four ways, after which a message box appears:-
Further Notes on Onomata Tests
1. Select Sound from the File menu and then click on the appropriate menu item.
2. On the computer keyboard, press F3 to toggle music or F4 to toggle sound effects.
[TOP]
Printing a Test
Using Onomata, it is possible to print out a standard 'type-in' or a multiple-choice test for use away from the computer.
In the Setup window, select either Multiple choice or Type in answers as required.
Choose the number of questions for the test; for Multiple choice the maximum is 20 and for Type in answers 50.
Multiple choice can be set to Hard (i.e. including a None of these option) if required.
Other test settings have no effect when printing a test.
To print the test, press the yellow Print Test button.
This opens standard Windows printer dialog windows from which a printer may be set up.
[TOP]
Viewing and Printing High Scores
Onomata keeps a record of the top 250 scores achieved by users on a particular vocabulary file. This is accessed from the Setup window. Lists of scores can be printed out.
Viewing High Scores
Click on the green View Scores button in the Setup window.
This opens the Onomata High Scores window which shows the Top 10 scores in its upper part and a scrollable list of the Top 250 scores in its lower part.
Score information provided
Printing High Scores
In the Onomata High Scores window, click on either the Print Top 10 or the Print Top 250 buttons according to which scores you wish to print out. Doing so brings up a standard Windows print dialogue box.
Note that, if you are using the network version of Onomata, you must enter the 'print' password before being allowed to proceed with printing.
Score information provided
To save paper, Print Top 250 will print the first ten entries and then only those where Name is other than Onomata (the default if there is no named user for an entry).
Clearing High Scores
If you wish to clear the high score tables, click on the Clear Top 10 and/or Clear Top 250 buttons in the Onomata High Scores window. In the single user version of Onomata, you will be asked to confirm your request; doing so clears the appropriate scores irreversibly.
Note that, if you are using the network version of Onomata, you must enter the 'clear' password before any scores are cleared.
Further Notes on High Scores
[TOP]
Viewing, Printing, and Saving Test Mistakes
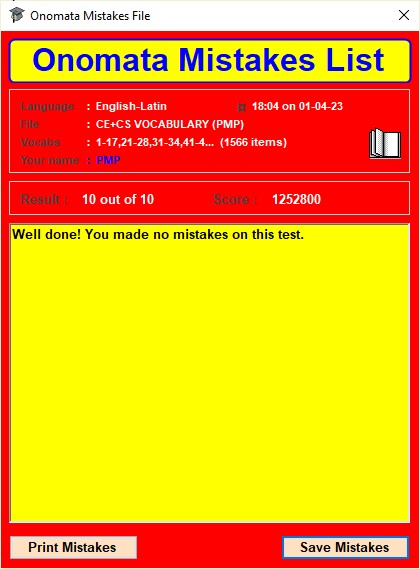
Onomata keeps a record of the mistakes made by each separately named user on the last test (whether completed or not) that he/she attempted. This is accessed from the Setup window.
Viewing Test Mistakes
Click on the red View Mistakes button in the Setup window.
This opens the Onomata Mistakes List window which shows details of the test taken in its upper part and a scrollable list of any mistakes made by the user on that test in its lower part.
The intention of the mistakes list is to highlight any vocabulary items which may be causing persistent problems so that learning effort can be concentrated on these.
The mistakes list can be saved as a rich text file or printed by clicking on the Save Mistakes or Print Mistakes button respectively.
Further Notes on Mistake Lists
Mistake list files are stored as text files within the Onomata application folder in the folder MistakeFiles; file names are of the form M_UserName.txt. It is recommended that you do not edit these files manually.
[TOP]
Viewing and Printing Vocabulary Lists
Reviewing a Vocabulary List or Selection
Click on the orange Review Selection button in the Setup window.
This opens the Onomata Vocabulary Reviewer window, which shows the contents of the vocabularies selected in the Setup window Selection box item by item.
Items are displayed in two panels; the upper panel shows the target language and the lower panel the base language. The content of the upper panel is always visible; the content of the lower panel is initially hidden.
Click on the < and > buttons to move backwards or forwards through the vocabulary items. If preferred, the left-arrow and right-arrow or the < and > keys can be used instead of the buttons.
Click on the Reveal button to show the content of the lower panel. If preferred, the up-arrow, down-arrow, or ? key can be used instead of the button.
The number of items and the number of the current item being reviewed are shown in a blue box to the left beneath the item display panels.
Clicking on the orange Shuffle button to the right beneath the item display panels randomly changes the display order of the items being reviewed; the text on the button will also change to Restore. This may be useful for practice self-testing before attempting a proper Onomata test. Clicking on the button when its text is Restore will return the review items to their original order.
The Reviewer window is resizable within certain limits to allow longer vocabulary items to be displayed more conveniently.
Viewing a Vocabulary List or Selection
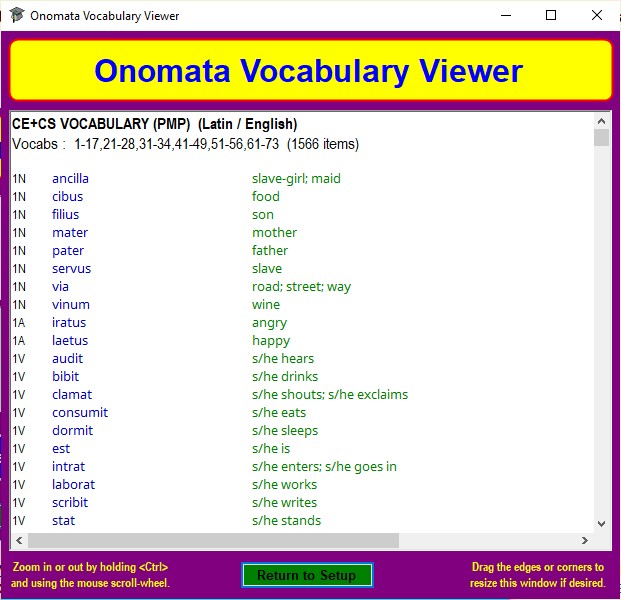
Click on the orange View Selection button in the Setup window.
This opens the Onomata Vocabulary Viewer window, which shows the contents of the vocabularies selected in the Setup window Selection box in a single list.
You can zoom in or out of the displayed list using your mouse scroll-wheel.
The Viewer window is resizable within certain limits to allow longer vocabulary items to be displayed more conveniently.
Printing a Vocabulary List or Selection
Click on the orange Print Selection button in the Setup window.
This opens standard Windows printer dialog windows from which a printer may be set up to print the contents of the vocabularies selected in the Setup window Selection box.
General
Viewing or printing a list or selection may be helpful as part of the vocabulary learning process.
It also lets you see what answer variations are allowable in Type-In tests.
[TOP]
Preparing Vocabulary Lists for Use with Onomata
Files, Lists, and Items
Vocabulary lists for Onomata are stored as text (.txt) files; these can be prepared using any text editor, such as Notepad or Wordpad.
Files are stored within the Onomata application folder in the folder Vocabs.
If a file contains only characters in the ISO-8859-1 Latin-1 Western European alphabet, it must be saved with encoding set as Unicode or UTF-8 . This will generally be the case if both the target and base languages are Western European (e.g. English, French, German, Spanish, Portuguese, Italian, Norwegian).
If a file contains any unicode characters in the form &#***; where *** is a 3-, 4-, or 5-figure character code, it must be saved with encoding set as ANSI or ASCII +  NCR. This will generally be the case if either the target or base language uses a non-Latin script (e.g. Cyrillic, Greek, Devanagari, Kana, most ancient languages) or a non-Western European Latin alphabet (e.g. most Eastern European languages, Vietnamese).
If a vocabulary file is saved with the wrong encoding, it will either be unloadable by Onomata or will display incorrectly in Onomata tests and print-outs.
A file must contain at least 20 vocabulary items and no more than 2500. The items may be divided into up to 250 lists.
A vocabulary item consists of three parts separated by | (the shifted \ character to the left of Z on a standard keyboard), as follows :-
Bear in mind when compiling an item that, on a type-in test, to get an answer correct, a user must type the necessary word/phrase in exactly the same form as entered in the list (although differences between upper and lower case letters can be ignored if the user selects this option in the Setup window before taking a test). All allowable variant answers should therefore be specified e.g. Je ne sais pas|I do not know\I don't know|3 (French), notus|well known\well-known\known\famous|15 (Latin).
Vocabulary List File Format
The first two lines of an Onomata vocabulary list file must be :-
* Target Language
* Base Language
Following should be lines showing the contents corresponding to each vocabulary list number (though these lines may appear at any point within the file).
The contents for each number must appear on separate lines beginning with # in the format :-
#N Contents (where N is the vocabulary list number)
The remainder of the file will consist largely of the actual vocabulary items (each made up of the three parts outlined above) in the format :-
Words/phrases in target language|Words/phrases in base language|Vocabulary list number
Comments, which will not appear in Onomata tests, may be added to a file at any point.
A comment must be on its own line, which must start with a . (full stop).
Typically details of the creation date and author of a file might be placed somewhere after the first two lines.
The code %1 on a line of its own may (optionally) be included at any point before the first item. This switches off Onomata's error checking for words/phrases longer than 30 characters. This facility should be used with caution as words/phrases longer than 30 characters may not display correctly in the test windows if the letters making up the word/phrase tend to be wide (e.g. m or w) rather than narrow (e.g. i or l).
The code %2 with a name following on a line of its own may (optionally) be included at any point before the first item; the name indicates the font to be used for the target language (usually a foreign language). If no %2 line is included, this font defaults to Arial. Names corresponding to fonts included with the full version of Onomata are:- AegeanU (for Mycenaean, Old Persian cuneiform, Phoenican, Ugaritic), ArabicU, ArialU, AvestanU, ChineseSU (for simplified Chinese), ChineseTU (for traditional Chinese), CuneiformU, Cyrillic, DevanagariU, EgyptHieroU (for Egyptian hieroglyphs), GeorgianU, Greek (for non-Unicode Greek), GreekU (for polytonic Greek), HebrewU, JapaneseU, KoreanU, MultiScript01U (for Aramaic, Coptic, Gothic), RomanU (for transliteration of cuneiform, hieroglyphs, and other scripts), ThaiU, TibetanU .
The code %3 with a name following on a line of its own may (optionally) be included at any point before the first item; the name indicates the font to be used for the base language (usually English). Details are as for %2 .
The code %4 with a name following on a line of its own may (optionally) be included at any point before the first item; the name indicates the voice to be used to speak words in the target language . For this to work, your computer must have Microsoft SAPI 5.1 or later and a suitable voice (e.g. ScanSoft Virginie_Dri40_16kHz for French ) installed.
The code %5 with a name following on a line of its own may (optionally) be included at any point before the first item; the name indicates the voice to be used to speak words in the base language (usually English). For this to work, your computer must have Microsoft SAPI 5.1 or later and a suitable voice (e.g. Microsoft Hazel Desktop for UK English ) installed.
The code %abcdefghij, where abcdefghij are any 10 different upper or lower case letters, on a line of its own may (optionally) be included at any point before the first item. Any of the 10 chosen letters may then be used to indicate (e.g. grammatical) categories for the items in the vocabulary list (see under Files, Lists, and Items above).
Information about a vocabulary file can be displayed from the Onomata Set Up window, if appropriate lines are included in the file. These must each start with the symbol ¬ in a Unicode file or with the character code ¬ in an ANSI file. Information lines can include formatting codes if desired (see Formatting codes for details of these).
For further guidance, see the examples below of parts of typical files and look at the vocabulary files supplied with Onomata.
Accents and Special Characters
If you are compiling a vocabulary file for a language which uses accented letters or other special characters, you may need to prepare an accent file so that users can enter the characters easily from a standard keyboard.
Accent files are stored in the Onomata application folder in the sub-folder Accent within the folder Files. They are text files with the file-type suffix .acc. To edit an accent file or to create your own, use a text editor such as Notepad or Wordpad.
Accent files for French, German, Spanish, and Italian are provided with Onomata.
If you need to create your own accent file, refer to the existing ones for guidance and note the following :-
Example Vocabulary List File 1 (This file would be saved with encoding Unicode, UTF-8)
* French
* English
. French Vocabulary Files for Common Entrance
. ISEB List
¬
¬!fs28 {m}{b+}French C.E. Vocabulary{b-}!fs24
¬
¬{r}This list is based on
the ISEB syllabus.
¬
¬{B}© P.S.M.Murray-Pearce
03.11.12
%1
%4ScanSoft Virginie_Dri40_16kHz
%5ScanSoft
Emily_Dri40_16kHz
%NVAapCPIxy
. Categories for
. Noun (N), Verb (V), Adjective (A)
. Adverb (a), Pronoun (p), Conjunction (C)
. Preposition (P), Interjection (I)
. x and y are unused categories
#1 La Classe
#2 Chez Moi
#17 Miscellaneous
le stylo|pen|1N
le crayon|pencil|1N
la gomme|rubber\eraser|1N
la règle|ruler|1N
le cahier|exercise book|1N
la salle de classe|classroom|1N
la chaise|chair|1N
la table|table|1N
le tableau|board|1N
la poubelle|waste-paper basket\bin|1N
la classe|class|1N
la maison|house|2N
un appartement|flat|2N
la pièce|room|2N
la chambre|bedroom|2N
un étage|floor\storey|2N
au premier étage|on the first floor|2N
la cuisine|kitchen|2N
le salon|sitting-room|2N
la salle|room\large room|2N
la salle à manger|dining-room|2N
la salle de bains|bathroom|2N
le mur|wall|2N
la porte|door|2N
la fenêtre|window|2N
la table|table|2N
la chaise|chair|2N
le lit|bed|2N
léger\légère|light|17A
lourd|heavy|17A
neuf\neuve|new|17A
plein|full|17A
vide|empty|17A
avoir|to have|17V
être|to be|17V
aller|to go|17V
dire|to say|17V
faire|to do\to make|17V
ici|here|17a
là|there|17a
avec|with|17P
sans|without|17P
Example Vocabulary List File 2 (This file would be saved with encoding ANSI or ASCII +  NCR)
* Gothic
* English
. Gothic Alphabet
. (c) P.S.M.Murray-Pearce 03.11.12
¬
¬!fs28 {m}{b+}Gothic Alphabet{b-}!fs24
¬
¬{r}The Gothic alphabet was used for Gothic c.350-600CE and written
left to right.
¬
¬{B}©
P.S.M.Murray-Pearce 03.11.12
%1
. Switch off check
for items over 30 characters long
%2MultiScript01U
. Quivira font for
Gothic
%3RomanU
. Gentium font for Gothic
transliteration
%NpAVaCPLnX
. Part of Speech Codes : N -
Noun, p - Pronoun, A -
Adjective, V - Verb
. (must be
10) a -
Adverb, C - Conjunction, P -
Preposition,
. L - letter, n -
Number, X - Phrase
#1 Gothic
Alphabet - Sounds
#2 Gothic Non-Alphabetical
Letters
��|a|1L
��|b|1L
��|g|1L
��|d|1L
��|e|1L
��|q|1L
��|z|1L
��|h|1L
��|þ\th|1L
��|i|1L
��|k|1L
��|l|1L
��|m|1L
��|n|1L
��|j|1L
��|u|1L
��|p|1L
��|r|1L
��|s|1L
��|t|1L
��|y|1L
��|f|1L
��|x|1L
��|ƕ\hw|1L
��|o|1L
��|90|2L
��|900|2L
[TOP]
Formatting Codes in Onomata Vocabulary Lists
Emphasis, Colour, Font, Alignment
The following codes can be used both in individual vocabulary items and in the information (¬ ) lines of a vocabulary file. If used in a vocabulary item, they temporarily override the default settings for that item i.e. the font set by %2 or %3 in the vocabulary file and colour black. If used in an information line, they apply until changed in the same line or a later one.
Almost all codes must be enclosed in braces i.e.
{...} .
The exceptions
are the codes to indicate change of font or font size, which start with !
(exclamation mark).
Colours : {K}
black {R} red {Y} yellow {G} green {B} blue {C} cyan {M} magenta
{k} dark grey {r} dark
red {y} dark yellow {g} dark green {b} dark
blue {c} teal {m} dark
magenta
{w}
light grey {p} pink
{W} white
Styles : {b+}
bold
on {b-} bold
off
{i+} italics on {i-} italics
off
{u+} underline on {u-} underline off {u.} dotted
underline on {u~} wavy underline
on
{S+} superscript on {s+} subscript on {s-} super/subscript off
Alignment : {la} left align {ra} right align {ca} centre align {ja} justify
Font
: !f0 Arial
!f1 Arial Narrow
!f2 Arial Unicode
!f3 Times New
Roman
!f4 Comic Sans MS !f5 Courier New !f6 Symbol
!f7 Gentium
!f10 SPIonic [Greek] !f11 KadmosU
[Greek] !f12 Ezra SIL [Hebrew]
!f13 Scheherazade
[Arabic]
!f14 Uttara [Devanagari]
Font Size : !fsX where X is the size in points ×2 (e.g. !fs28 gives a 14 point font)
The Font
and Font Size codes must be followed by a space .
The
other codes must not be followed by a space
.
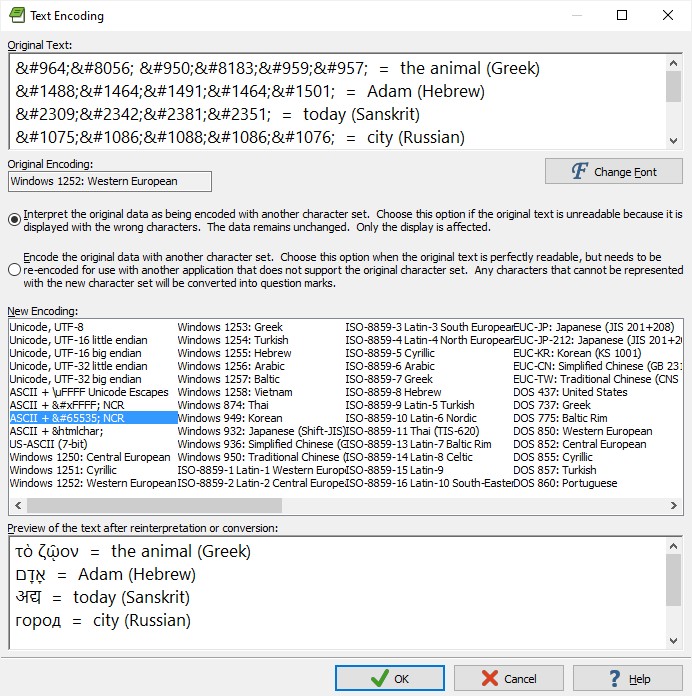
Unicode Characters
Characters with ASCII codes 32-127 (i.e. Basic Latin) and 160-255 (i.e. Latin-1 Supplement ) can be directly entered into vocabulary lists.
Others (e.g. Greek, Cyrillic, Hebrew, Arabic, Devanagari, Japanese, Chinese, Korean) should be entered in the form &#N; , where N is a decimal integer of 3-5 digits from 256-65535 representing the Unicode value for the character.
e.g.1. τὸ ζῷον is the ancient Greek for the animal
2. אָדָם is the Hebrew for Adam
3. अद्य is the Sanskrit for today
4. город is the Russian for city
Note
I recommend the text editor EditPad Lite (https://www.editpadlite.com/) to allow non-Latin characters to be displayed both directly and as the corresponding Unicode values. This makes it easier to ensure that Unicode values correspond to the text intended.
To convert from Unicode to characters, open a blank file with encoding Windows 1252: Western European and import the Unicode values .
Then convert text encoding to ASCII + 𐀀 NCR (or ASCII +  NCR or ASCII + &htmlchar;) , interpreting the original data, as in the example below, and click OK .
To convert from characters to Unicode, open a blank file with encoding ASCII +𐀀 NCR (or ASCII +  NCR or ASCII + &htmlchar; ) and import the characters; the text must be from a source (e.g. a Word document or an HTML page) using Unicode.
Then convert text encoding to Windows 1252: Western European, interpreting the original data, as in the example below, and click OK .

Examples of Code Use
In the first of these vocabulary items, bold is turned off for part of the target language.
In the second, the font is changed to Arial (from a default set by %2GreekU) and the colour to dark blue for part of the target language.
ὁ βιος{b-}, -ου|life|54N
δια !f0 {b}+Gen|through|54P
In these information lines: the font size is set to 14 (!fs28) and later to 12 (!fs24); the words 'Gothic Alphabet' are emboldened; colours are set so that the first line is in dark magenta, the second in dark red, and the third in blue.
¬!fs28
{m}{b+}Gothic Alphabet{b-}!fs24
¬{r}The Gothic alphabet
was used for Gothic c.350-600CE and written left to right.
¬{B}© P.S.M.Murray-Pearce 03.11.12
[TOP]
Music and Image Files
Onomata is supplied with a selection of music and image files to act as a background during tests. These files may be changed if desired.
Music
Up to 100 different MIDI background tunes may be used with Onomata. Their files (type .mid) are stored in the Onomata application folder in the folder Files and must be named consecutively midi00.mid, midi01.mid, midi02.mid, ..., midi98.mid, midi99.mid. MIDI file size is best kept under 30k. Simply substitute your own MIDI files for the ones provided, renaming them appropriately.
If you wish a MIDI tune to start or end at a point other than its normal one (for example, to play only a section of the tune), this may be achieved by creating a text file (in the Files folder) with the same name as the corresponding MIDI file (e.g. midi00.txt to go with midi00.mid) and consisting of up to two lines, the first containing the number indicating the start point and the second the number for the end point. A line left blank or containing a number less than or equal to zero indicates a normal start or end point.
Images
In its test windows Onomata displays an image as a backdrop to the 'jewels' used to represent correct answers.
Images can be related to the target (foreign) language in a vocabulary file or be more general. Up to 100 images for each language and for the 'general' category may be stored in the Onomata application folder in the folder Files; images may be in GIF (.gif) or JPEG (.jpg) formats only. Images for each language are named consecutively in the form LanguageBack00.gif (or .jpg), LanguageBack01.gif, ..., LanguageBack99.gif (e.g. FrenchBack00.gif etc.); general images are named GeneralBack00.gif (or .jpg), GeneralBack01.gif, ..., GeneralBack99.gif.
Image dimensions should be 196 pixels wide by 354 pixels high and size is best kept under 20k (images with larger or smaller dimensions are adjusted to fit 196x354 pixels and may therefore look distorted).
Use a photo (bitmap) editing program to crop your intended images to the correct dimensions and to compress them to under 20k and then add them to or substitute them for the images already provided in Onomata.
If you wish to provide captions for your language-related images, the captions must be stored in a text file (in the Files folder) with a name of the form LanguageBack.txt (e.g. FrenchBack.txt). Within the file, each caption must be listed on a separate line in an order matching the numbering of the images; a blank line indicates no caption for that image. Captions must always end with the characters |T or |B (the | is on the key to the left of Z on a standard keyboard); |T indicates that the caption will appear at the top of the image, |B at the bottom. Captions should be no longer than 25-30 characters to avoid truncation on screen.
[TOP]
Onomata Network Version
There are two versions of Onomata, single user and network. The network version allows users on a network to compete with one another and/or for their test results to be compared.
Network Version Differences
Password File
Supplied with the network version is a password file Password.txt; this is found within the Onomata application folder in the Files folder.
This contains two passwords, each on a separate line. The first is the password for printing or clearing the Top 10 high scores and the second for printing or clearing the Top 250. If no passwords are provided, or if the Password.txt file is not present, both passwords default to the word password (in lower-case letters).
The two passwords may be changed to suit the program administrator.
User Name Format File
Supplied with the network version is the file NameFormat.txt; this is found within the Onomata application folder in the Files folder.
The first line of the file must be one of four possible format codes :- ULU, UL, U, or L.
As indicated in the file, each code affects the way in which user logon names will be displayed in Onomata (particularly in High Score tables).
The program administrator should choose the code which best matches the format used for logon names on his/her network.
[TOP]